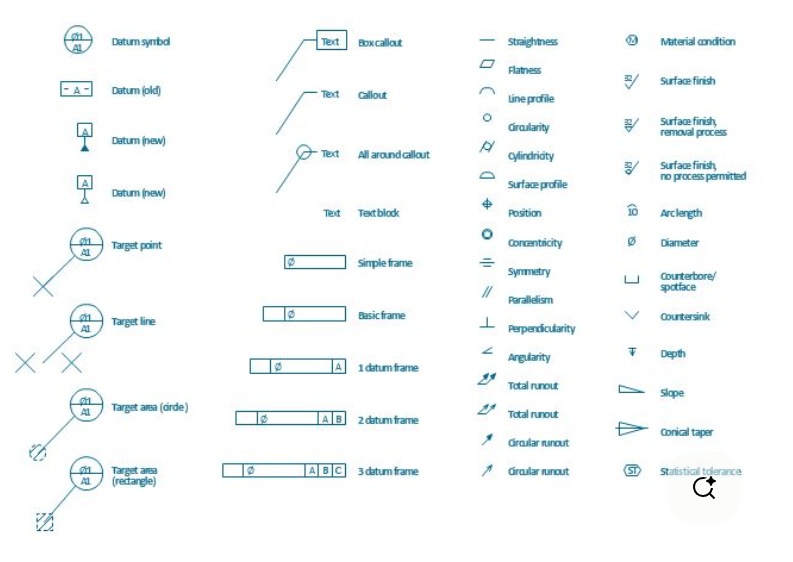
Dimensioning is the process of measuring and specifying the size, shape, and location of features on a part or object in technical drawings. It provides the necessary information for manufacturing, construction, or assembly, ensuring that parts are made accurately and fit together properly. Dimensions can include lengths, widths, heights, angles, diameters, radii, and other geometric details, depending on the complexity of the design.
Dimensioning is a critical aspect of engineering, architecture, and design because it communicates precise measurements from the designer to the manufacturer. Without accurate dimensioning, even a well-designed part may not function as intended or may fail to assemble correctly. It acts as a universal language, ensuring that everyone involved in production understands the exact specifications of the part or structure.
Various methods of dimensioning exist, including linear, angular, radial, diametral, and ordinate systems. Each method serves a specific purpose, whether measuring straight distances, angles, circular features, or positioning features relative to a datum. The choice of dimensioning method depends on the type of object, its function, and the level of precision required. Proper dimensioning also helps prevent errors, reduces waste, and improves efficiency in production.
Types of Dimensioning
Linear Dimensioning
Linear dimensioning is the most basic and widely used type of dimensioning. It specifies the straight-line distance between two points, edges, or features on an object. Linear dimensions can be horizontal, vertical, or aligned at an angle and are essential for defining the exact size of components in mechanical or architectural drawings.
Angular Dimensioning
Angular dimensioning specifies the angle between two lines, surfaces, or features. It is commonly used when parts are not perpendicular or parallel, such as in inclined planes, beveled edges, or mechanical components with specific angular requirements. This type of dimensioning ensures that components fit together accurately in assemblies.
Radial Dimensioning
Radial dimensioning is used to define the radius of arcs or circles. It typically applies to curved features in mechanical parts, such as holes, fillets, or rounded edges. Radial dimensions are crucial for ensuring the correct curvature, which can affect both function and aesthetics in a design.
Diametral Dimensioning
Diametral dimensioning measures the diameter of circular features rather than the radius. It is particularly important for holes, cylindrical rods, and other circular components where the diameter is critical for assembly or mechanical function. This type of dimensioning ensures proper fitting of mating parts.
Chain Dimensioning
Chain dimensioning involves placing dimensions sequentially along a line or path, one after another, creating a “chain.” This type of dimensioning is simple to apply but can accumulate errors if not carefully managed. It is best suited for non-critical measurements or small assemblies.
Baseline (Datum) Dimensioning
Baseline or datum dimensioning uses a common reference line, edge, or point (datum) to measure all other features. This method reduces cumulative errors because all measurements are taken from a fixed starting point rather than from feature to feature. It is widely used in precise engineering applications.
Coordinate Dimensioning
Coordinate dimensioning specifies the location of features using X, Y, and sometimes Z coordinates from a known origin point. It is commonly used in CNC machining and CAD design, where precise positioning of holes, slots, and other features is critical. This type of dimensioning ensures high accuracy in manufacturing.
Chain (or Continuous) Dimensioning
Sometimes distinguished from simple chain dimensioning, continuous dimensioning measures multiple adjacent features along a line while maintaining the total distance. It is often used in architectural drawings for layouts, walls, or repetitive components. However, care must be taken to prevent error accumulation.
Ordinate Dimensioning
Ordinate dimensioning is a method where all feature measurements are referenced from a single axis or zero point. It is particularly useful for components with multiple holes or features in a straight line. By referencing a single point, ordinate dimensioning minimizes errors and simplifies inspection and manufacturing.
Symmetrical Dimensioning
Symmetrical dimensioning is used when features are equally spaced around a centerline or central point. Instead of dimensioning each feature individually from one side, the distances are measured from the center, reducing clutter in drawings. This method is commonly used for parts with symmetrical holes, slots, or other repeated features.
Repetitive Dimensioning
Repetitive dimensioning is applied when the same feature, such as holes, slots, or ribs, appears multiple times on a part. Instead of dimensioning each individually, the dimension is indicated once along with the quantity, simplifying the drawing and making it easier to read.
Chain Baseline Hybrid Dimensioning
This method combines elements of both chain and baseline dimensioning. Features are dimensioned sequentially like a chain but referenced from a baseline or datum to reduce error accumulation. It is often used in mechanical engineering when both total length and individual feature locations are critical.
Note-Based Dimensioning
Instead of using traditional lines and arrows, note-based dimensioning uses textual notes to indicate size, location, or tolerance. This type is useful in architectural and civil drawings for conveying information about materials, finishes, or special requirements in addition to dimensions.
Functional Dimensioning
Functional dimensioning emphasizes the dimensions that are critical to the part’s function rather than every possible measurement. Only the features that affect assembly, movement, or performance are dimensioned, simplifying drawings and focusing attention on key aspects of the design.
Auxiliary Dimensioning
Auxiliary dimensioning provides secondary or reference measurements that complement primary dimensions. These are not essential for manufacturing but help clarify the drawing or facilitate inspection. Auxiliary dimensions often appear as dashed or dotted lines to distinguish them from primary measurements.